
Building Alfresco Projects Using Bitbucket Pipelines

As an Alfresco Platinum Partner and five-time Alfresco Americas Partner of the Year, Zia Consulting does a lot of Alfresco implementations. Zia is also an Atlassian shop; we use Jira to manage our sprints and for defect tracking, and we use Bitbucket to manage our source code. This article explores how Zia makes use of another one of Atlassian’s tools — Pipelines — to deliver solutions for our clients.
History
Prior to the release of Pipelines, Zia built its clients’ software on a Jenkins instance hosted on Amazon EC2. This instance was somewhat unstable due to having been installed in a less-than-optimal manner and not being maintained regularly. Then a vulnerability was discovered in the version of Apache commons used by Jenkins, and we had to block use of Jenkins outside of Zia’s VPN. This was inconvenient for our employees working from home or at a client site—we needed to upgrade our build system.
In 2016, Atlassian introduced their Pipelines continuous integration tool which was tightly integrated with Bitbucket and very elegant in design. Zia began using this tool as soon as it was out of Beta. Our new projects were all built using Pipelines and, after about a year, we discontinued use of Jenkins entirely, migrating the few actively-developed projects that remained.
A love letter to Atlassian’s Pipelines product development team: You guys know how to release software. Pipelines, when first released, was truly a “minimum viable product.” It met Zia’s needs but just barely. We were able to use it to replace Jenkins, but we had to work around a number of missing features. Over the last few years, Pipelines has added functionality on a regular basis addressing every need we’d identified and doing so without introducing bugs or adding to the complexity of the tool. As software developers ourselves, we recognize the discipline that’s required to accomplish this, and we respect how well you’ve done it. Hats off to your team.
How Pipelines Works
Pipelines is very simple at its core: when you push a change to Bitbucket, Pipelines executes a script to build your project. The script is defined in the bitbucket-pipelines.yml configuration file which you must keep at the top of your source code repository.
Here’s a simple configuration file that will build a Maven-based Java project:
image: maven:3.3.9
pipelines:
  default:
    - step:
        script:
          - mvn clean package
The first line of this configuration file specifies the Docker image that Bitbucket should use to execute the build script. Since the build command uses Maven, we specify a Docker image that includes Maven (and a JDK). The Docker image in this example comes from Docker Hub, but there is additional configuration syntax to support other Docker image repositories including private repositories.
Using Pipelines to Build Alfresco Customizations
The example above may actually be sufficient to build an Alfresco Community customization. Zia, however, works exclusively with Enterprise clients. In order to build Enterprise projects, Maven needs access to Alfresco’s private Maven repository. When you purchase Alfresco Enterprise, you can contact Alfresco support to request the credentials needed to access this repository.
You can configure Maven to use this repository by configuring settings.xml as shown:
<settings xmlns="https://maven.apache.org/SETTINGS/1.0.0"
          xmlns:xsi="https://www.w3.org/2001/XMLSchema-instance"
          xsi:schemaLocation="https://maven.apache.org/SETTINGS/1.0.0
                              https://maven.apache.org/xsd/settings-1.0.0.xsd">
  <localRepository/>
  <interactiveMode/>
  <usePluginRegistry/>
  <offline/>
  <pluginGroups/>
  <servers>
    <server>
      <id><strong>alfresco-private-repository</strong></id>
      <username><strong>myCompanysAlfrescoMavenRepoUsername</strong></username>
      <password><strong>myCompanysAlfrescoMavenRepoPassword</strong></password>
    </server>
  </servers>
  <mirrors/>
  <proxies/>
  <profiles/>
  <activeProfiles/>
</settings>
The server ID specified above matches the ID that Alfresco’s Maven SDK archetype creates in your new project’s pom.xml.
In order for Pipelines to use settings.xml, we’ll have to check it in. We’re not about to commit our credentials in plain text, so instead we tell Maven to get the credentials from environment variables like this:
<server>
      <id>alfresco-private-repository</id>
      <username><strong>${env.ALF_REPO_UN}</strong></username>
      <password><strong>${env.ALF_REPO_PW}</strong></password>
    </server>
Pipelines allows you to configure variables at the repository level and at the account level. Account-level variables are available to all the Bitbucket repositories. Zia has saved its credentials for Alfresco’s Maven repository at the account level; this prevents us from having to configure it for each new project.
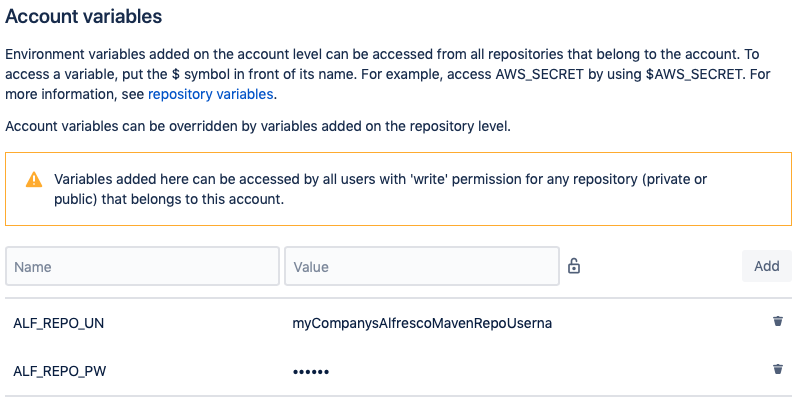
Notice that the password has been obscured. By clicking the lock icon next to the variable’s value, we were able to prevent the password from being seen — even by administrators.
Now we can commit the settings.xml to our source code repository and modify the pipelines configuration so the build command uses it as shown:
  script:
          - mvn -s settings.xml clean package
At Zia, we refined this process further, rather than requiring each project to have an identical copy of the Maven settings.xml file, we instead built a Docker image that comes with the settings.xml already in a location where Maven will pick it up automatically.
Building Our Docker Image
The following Dockerfile creates an image that uses the official Maven image as a starting point and then places the setting.xml file in the root user’s Maven configuration directory.
FROM maven:3.3.9
ADD settings.xml /root/.m2/settings.xml
At this point, you can build the new Dockerfile and publish it on Docker Hub, the central Docker image repository. Remember that this settings file does not contain any credentials; those are configured in Pipelines. Therefore, it’s safe to make this available on a public Docker image repository.
$ docker build -t my-docker-hub-org/my-image-name .
$ docker login -u my-docker-hub-username -p my-docker-hub-password
$ docker push my-docker-hub-org/my-image-name
Now it’s a simple matter of updating the Pipelines configuration to use this new image by editing the first line of bitbucket-pipelines.yml to look like this:
image: my-docker-hub-org/my-image-name
This is a simplification of Zia’s actual build image. We decided that, to be safe, we would like to build with the same JDK that Alfresco runs on. Since Alfresco currently ships with Oracle’s JDK, we decided to build an image that has Oracle’s JDK installed. We also added Maven and some other handy tools for use in our builds.
A Pipeline for the Docker Image
Of course, Zia keeps the assets to build this Docker image under source control. It’s simple to use Pipelines to automate the build and deployment of this image.
It’s tricky to make Docker work well inside another Docker image but the Pipelines team figured this out. All we need to do is enable this feature with a “docker: true” setting in the project’s bitbucket-pipelines.yml file:
pipelines:
  default:
    - step:
        script:
          - docker build -t my-docker-hub-org/my-image-name .
          - docker login -u $DOCKER_HUB_UN -p $DOCKER_HUB_PW
          - docker push my-docker-hub-org/my-image-name
options:
  docker: true
Notice that we didn’t bother to specify a Docker image to use for this build; we’re just using the image Atlassian provides by default.
We set up two more account variables in Bitbucket for Zia’s Docker Hub username and password. This is the same process that we used to define variables for Alfresco’s Maven repository username and password.
Now, every time we push a change to our Docker image, it is automatically built and published to Docker Hub.
Publishing Alfresco Artifacts
Zia has adopted the practice of deploying artifacts that have been built by our automated tools rather than artifacts one of our developers built on his or her laptop. Most of our clients have hosting environments that are secured to such an extent that it is difficult or impossible to push artifacts directly to their servers. Our approach is to publish our artifacts to Bitbucket’s “Downloads” area; this is accessible to our clients’ servers—they can pull the artifacts and install them from there.
Building WAR Files
Zia has found that we can reduce errors during the deployment process by building WAR files rather than Alfresco Module Packages (AMPs) or JAR files. We accomplish that by adding a profile to our top-level pom.xml as recommended by Alfresco’s Martin Bergljung:
…
    <profile>
        <id>generate-wars-only</id>
        <properties>
            <maven.alfresco.startTomcat>false</maven.alfresco.startTomcat>
        </properties>
    </profile>
</profiles>
We also added a property for our version to the same top-level pom.xml:
…
    <my.project.version>1.0.1</my.project.version>
</properties>
Then, flagrantly violating Maven best practices, we use that property to define the version of the artifacts built by the share and platform Maven projects by editing each of their pom.xml files:
<project>
    <modelVersion>4.0.0</modelVersion>
    <artifactId>my-project-platform-jar</artifactId>
    <version>${my.project.version}</version>
    <name>My Project</name>
    <packaging>jar</packaging>
…
Notice that the packaging of this project is a JAR. We’re still going to build JAR files (or perhaps AMPs) for these sub-projects, but the top-level package will package those JARs into the Alfresco repository and Share web applications’ WAR files.
Some Maven purists at Zia argue the correct thing to do here is edit the share and platform pom.xml files individually and hard-code the version numbers. Others of us prefer to specify the version number in one place as shown above.
Our project’s bitbucket-pipelines.xml file needs to be updated to make use of the profile we created to generate WAR files:
image: my-docker-hub-org/my-image-name
pipelines:
  default:
    - step:
        script:
          - mvn clean install alfresco:run -Pgenerate-wars-only
Publishing to Downloads
Now that we’re creating WAR files, we need to put them someplace accessible to the client’s servers. Bitbucket provides a “Downloads” area with each repository which is convenient for our purposes. We can call Bitbucket’s REST API to upload the file. Here’s a script that uploads a file to Bitbucket; we can call this from the Pipelines configuration:
#!/bin/bash
if [ -z "$1" ]
then
    echo "usage: publish.sh <path-to-artifact>"
    exit 1
fi
endpoint="https://api.bitbucket.org/2.0/repositories/$BITBUCKET_REPO_OWNER/$BITBUCKET_REPO_SLUG/downloads"

curl -v -f -i -s -u $BB_CI_UN:$BB_CI_PW -X POST “$endpoint”
Notice the use of the environment variables BITBUCKET_REPO_OWNER and BITBUCKET_REPO_SLUG. These environment variables and many others are defined by Pipelines and facilitate the creation of reusable scripts.
The variables BB_CI_UN and BB_CI_PW are not defined by Bitbucket. These should be the credentials of an account that has write access to your repository. You have a couple of options for defining these variables:
- Create a service account that is used by all of your projects. Set BB_CI_UN and BB_CI_PW to this service account’s credentials using the “account variables” feature. This is the same area where we saved the Alfresco Maven repository credentials and Zia’s Docker Hub credentials.
Note: When using a common service account, don’t forget to add this service account to your repository’s “user and group access” with write permissions. - Use an existing account that already has write access to this repository. If you choose this approach, you should use the “repository variables” configuration area specific to this repository to define BB_CI_UN and BB_CI_PW.
Whichever option you choose, you should use Bitbucket’s “app passwords” feature to generate the password that you use. This has a number of advantages:
- App passwords don’t require two-factor authentication. You’re likely to get a “forbidden” response calling the REST services using your interactive password.
- You can restrict the operations available to the REST services using your app password. See below for a screenshot of the option selected to enable publishing to the downloads area.
- You can create different passwords for your various services and revoke the passwords individually.

In order to use the script that publishes to the Downloads area, we save it to the top level of our source-code repository. Then we call it from our Pipelines configuration like this:
image: my-docker-hub-org/my-image-name
pipelines:
  default:
    - step:
        script:
          - mvn clean install alfresco:run -Pgenerate-wars-only
          - ./publish.sh target/share.war
          - ./publish.sh target/platform.war
Now, after each build, the files share.war and platform.war are updated in Bitbucket’s downloads area.
Renaming Artifacts
Zia renames the WAR files to include the version number before they’re published, so the file published looks like “share.war-1.0.1” instead of just “share.war”.
The only tricky part of this is figuring out the version number. We accomplish this by asking maven:
mvn -q -Dexec.executable="echo" -Dexec.args='${project.version}' --non-recursive org.codehaus.mojo:exec-maven-plugin:1.3.1:exec
This command will return the version of the Maven project in the current directory. Keep in mind that the version of the top-level project is not actually the version number that we want. Instead, we want the version that was set in the my.project.version variable of our top-level POM file and propagated to the version number of the share and platform POM files.
This script renames and publishes the project’s WAR files:
#!/bin/bash

# get the version number of the platform project
cd my-project-alfresco-platform-jar
PLATFORM_VERSION=$(mvn -q -Dexec.executable="echo" -Dexec.args='${project.version}' --non-recursive org.codehaus.mojo:exec-maven-plugin:1.3.1:exec)
cd –

# get the version of the share project (probably the same)
cd my-project-alfresco-share-jar
SHARE_VERSION=$(mvn -q -Dexec.executable="echo" -Dexec.args='${project.version}' --non-recursive org.codehaus.mojo:exec-maven-plugin:1.3.1:exec)
cd –

# rename the artifacts
mv target/share.war target/share.war-$SHARE_VERSION
mv target/platform.war target/platform.war-$PLATFORM_VERSION

# publish the artifacts
./publish.sh target/share.war-$SHARE_VERSION
./publish.sh target/platform.war-$PLATFORM_VERSION
Here is the Pipelines configuration using the above script:
image: my-docker-hub-org/my-image-name
pipelines:
  default:
    - step:
        script:
          - mvn clean install alfresco:run -Pgenerate-wars-only
          - ./rename-and-publish-artifacts.sh
Manual Steps
Some teams at Zia don’t want to generate the artifact until all the developers have contributed their work. There are a number of ways to accomplish this. For example, Pipelines can execute different build scripts based on the branch name. You could leverage this feature to publish off the master branch and the other branches just build to ensure everything compiles.
Another way to accomplish this is with a manual step. Here’s a modified version of our Pipelines configuration:
image: my-docker-hub-org/my-image-name
pipelines:
  default:
    - step:
        name: Build
        script:
          - mvn clean install alfresco:run -Pgenerate-wars-only
        artifacts:
          - target/*.war
    - step:
        name: Publish
        trigger: manual
        script:
          - ./rename-and-publish-artifacts.sh
This breaks our build process into two steps. The first step builds the WAR files and then saves them off somewhere in Atlassian’s cloud. The Docker container that ran that step is then destroyed and when you look at the build, it indicates that the build ran successfully and prompts you to run the next step to publish the WAR files.
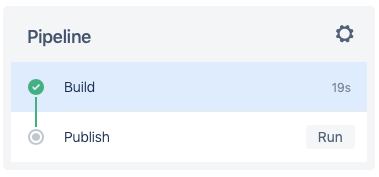
When the user presses the Run button, Pipelines will rename the WAR files and publish them to Bitbucket’s downloads area.
Deploying Artifacts
If your infrastructure allows you to push directly to your hosting environments from Bitbucket, then you should take advantage of the Pipelines deployments feature. This will allow you to see which commit has been pushed to your development, test, and production environments.
Most of our clients’ network environments are configured to make it difficult or impossible to push content to their servers, so instead we typically call Bitbucket’s REST API to pull the build artifacts (just as we called Bitbucket’s API to publish the artifacts).
Here’s an example of a script that we use to upgrade an Alfresco installation to use a new version of our customizations. This script is not intended to be called by Pipelines; it runs on the target server where we intend to deploy our code.
#!/bin/bash

if [ "$#" -ne 2 ]
then
    echo "usage: pull.sh <version-to-pull> <bitbucket-username>"
    exit 1
fi

version="$1"
username="$2"

archive=/opt/war-archive
installDir=/opt/alfresco
webappsDir=$installDir/tomcat/webapps
bbOwnerAndRepo=my-bb-account/my-bb-repository

# fetch the artifacts from Bitbucket
cd $archive
curl -s -L -u $username https://api.bitbucket.org/2.0/repositories/$bbOwnerAndRepo/downloads/share.war-$version -O
curl -s -L -u $username https://api.bitbucket.org/2.0/repositories/$bbOwnerAndRepo/downloads/alfresco.war-$version -O

# stop alfresco
$installDir/alfresco.sh stop

# remove the old webapps (both the links to the WAR files and the expanded directories)
rm $webappsDir/alfresco.war
rm $webappsDir/share.war
rm -rf $webappsDir/share
rm -rf $webappsDir/alfresco

# set up symbolic links to the WAR files in the archive
ln -s $archive/share.war-$version $webappsDir/share.war
ln -s $archive/alfresco.war-$version $webappsDir/alfresco.war

# clean up tomcat cache
rm -rf $installDir/tomcat/work/Catalina

# restart alfresco
$installDir/alfresco.sh start
This script stops Alfresco, downloads and installs the new artifacts, clears out Tomcat’s cache, and then restarts Alfresco. If these new modules require configuration (such as adding new properties to alfresco-global.properties), then you’ll have to make those changes manually prior to executing this script. For sandbox and development environments, we sometimes also delete the Solr indexes so they get rebuilt.
Notice that we keep the artifacts in an “archive” directory and create symbolic links to those files from the Tomcat webapps directory. This has two advantages. First, it makes it easy for a system administrator to see what version of the customizations are installed:
$ ls -l /opt/alfresco/tomcat/webapps/*.war
lrwxrwxrwx. 1 alfresco alfresco        35 Apr  4 09:26 /opt/alfresco/tomcat/webapps/alfresco.war -> /opt/war-archive/alfresco.war-1.0.3
-rw-r--r--. 1 alfresco alfresco    274591 Oct 31  2017 /opt/alfresco/tomcat/webapps/ROOT.war
lrwxrwxrwx. 1 alfresco alfresco        32 Apr  4 09:26 /opt/alfresco/tomcat/webapps/share.war -> /opt/war-archive/share.war-1.0.3
-rw-r--r--. 1 alfresco alfresco 100394638 Oct 31  2017 /opt/alfresco/tomcat/webapps/solr4.war
-rw-r--r--. 1 alfresco alfresco    764124 Aug 22  2017 /opt/alfresco/tomcat/webapps/_vti_bin.war
The second advantage is that it makes it easy to roll back to a previous version of the customizations
We strongly encourage anyone implementing Alfresco to use a configuration management tool such as Ansible to implement processes like this.
Conclusion
The techniques described above are a simplification of the actual build processes in place at Zia. All of our projects use feature and release branches, for example, that have unique build steps. Some of our tech leads have git commands that tag commits when we publish artifacts. Others use Maven’s release process to publish artifacts to our Artifactory Maven repository.
Since the Pipelines team is busy adding new features, we are constantly enhancing our build processes to make use of those features. For example, we’re currently exploring custom Pipelines pipes to enable reuse of our build scripts between projects.
We at Zia don’t intend to advocate any of the specific approaches we just described, but rather we hope to have provided you with ideas for how to use this powerful set of tools that Atlassian has provided in your Alfresco implementation.
For additional information on this, or any other technology, contact us today.