
This post walks through the steps required to store Alfresco & Solr data between multiple Helm installations. This is used to run Alfresco Content Services (ACS) in a local kubernetes cluster like Docker Desktop. This article assumes you have read the previous articles in this series Getting Started with Alfresco and Kubernetes: The Beginning and Getting Started with Alfresco and Kubernetes: Running Alfresco Content Services (Enterprise) in Docker Desktop
The default option to spin up ACS will not reuse the data that was created when the helm chart is reinstalled, as mentioned in the blog post (https://www.ziaconsulting.com/developer-help/kubernetes-2/). To save data across multiple Helm installs, we will create persistent volumes (PV) and persistent volume claims (PVC) to store the data. The previous blog also has the prerequisites to run Alfresco in Kubernetes using Helm. We will be spinning up ACS 6.2.0.
The commands shown in this blog have been tested on my Docker Desktop Kubernetes cluster that is deployed on macOS Catalina. The custom subchart that is created using the steps shown below can be viewed at https://github.com/ziaconsulting/demo-helm-acs/tree/v1.0.
Create the Helm Subchart
Before we begin, let us create a new empty root folder ‘demo-helm-acs’. This is the root folder that will be checked into source control. We will refer to this root folder in various locations in the blog. The following commands are used to create an initial subchart.
$ mkdir demo-helm-acs
$ cd demo-helm-acs # this is the root folder
$ mkdir helm
$ cd helm
$ helm create zia-acs # this is the name of the subchart
$ cd zia-acs
$ rm -rf templates/*
To specify the dependency for the chart, we will create a requirements.yaml file with the following contents.
dependencies:
  - name: alfresco-content-services
    version: 3.0.3
    repository: https://kubernetes-charts.alfresco.com/stable
More details on how to create a subchart can be found at https://v2.helm.sh/docs/chart_template_guide/#subcharts-and-global-values and more details on helm chart dependencies can be found at
https://v2.helm.sh/docs/developing_charts/#managing-dependencies-with-requirements-yaml
The repository mentioned in the requirements.yaml file should be added using the following command
$ helm repo add alfresco-stable https://kubernetes-charts.alfresco.com/stable
We should now download the dependencies using the below command
$ helm dependency update
After the above command runs, you will see a charts/alfresco-content-services-3.0.3.tgz file.
Create the custom Persistent Volumes (PV) & Persistent Volume Claims (PVC)
ACS requires us to create PVs & PVCs for both Alfresco and Solr. More details on PVs and PVCs can be found at https://kubernetes.io/docs/concepts/storage/persistent-volumes/. We should create a pvc.yaml file that has the following contents.
apiVersion: v1
kind: PersistentVolume
metadata:
  name: acs-pv
  Labels:
    type: local
spec:
  storageClassName: acsstorage
  capacity:
    storage: 20Gi
  accessModes:
    - ReadWriteOnce
    - ReadOnlyMany
  hostPath:
    path: "/Users/vijayprince/helm/pvc/volumes/acs" #update this path
---
apiVersion: v1
kind: PersistentVolumeClaim
metadata:
  name: alfresco-volume-claim
  labels:
    app: acs
spec:
  storageClassName: acsstorage
  accessModes:
    - ReadWriteOnce
    - ReadOnlyMany
  resources:
    requests:
      storage: 20Gi
---
apiVersion: v1
kind: PersistentVolume
metadata:
  name: {{ .Release.Name }}-alfresco-search-solr-pv
  labels:
    type: {{ .Release.Name }}-alfresco-search-solr
spec:
  storageClassName: {{ .Release.Name }}-alfresco-search-solr-sc
  capacity:
    storage: 20Gi
  accessModes:
    - ReadWriteOnce
    - ReadOnlyMany
  hostPath:
    path: "/Users/vijayprince/helm/pvc/volumes/solr" #update this path
---
apiVersion: v1
kind: PersistentVolumeClaim
metadata:
  name: {{ .Release.Name }}-alfresco-search-solr-claim
  labels:
    app: {{ .Release.Name }}-alfresco-search-solr
spec:
  storageClassName: {{ .Release.Name }}-alfresco-search-solr-sc
  accessModes:
    - ReadWriteOnce
    - ReadOnlyMany
  resources:
    requests:
      storage: 20Gi
For the ACS deployment we use a hardcoded PVC name alfresco-volume-claim because this name is hardcoded in the parent helm template https://github.com/Alfresco/alfresco-process-infrastructure-deployment/blob/develop/helm/alfresco-process-infrastructure/templates/pvc.yaml.
The Solr PVC name that we use is based on the template seen in the link https://github.com/Alfresco/alfresco-search-deployment/blob/master/helm/alfresco-search/templates/pvc.yaml.
The alfresco-search.fullName macro mentioned in this template uses the “.Release.Name” we set and the name of the chart, which is alfresco-search. As such the name we use is {{.Release.Name }}-alfresco-search-solr-claim.
Inject Custom values in the Subchart
We will get the default values.yaml for ACS Helm Chart version 3.0.3 using command
$ curl -O https://raw.githubusercontent.com/Alfresco/acs-deployment/3.0.3/helm/alfresco-content-services/values.yaml
The above curl command is only shown for you to understand how I created my custom values.yaml file. I had to modify this default values.yaml file to match my requirements. In case you want to create a custom values.yaml for a different ACS helm chart, you will need to use a similar curl command to download the default and update it as needed.
The values.yaml will be replaced with the following values. The updated properties are under ‘alfresco-content-services’ to make the parent ‘alfresco-content-services’ chart use our properties instead of the default. Only the properties mentioned below ‘alfresco-content-services’ in the values.yaml file shown below will be overridden in the parent chart. All other properties of the parent chart mentioned in the values.yaml received from the curl command will remain the same.
alfresco-content-services:
  repository:
    replicaCount: 1
  transformrouter:
    replicaCount: 1
  pdfrenderer:
    replicaCount: 1
  imagemagick:
    replicaCount: 1
  libreoffice:
    replicaCount: 1
  tika:
    replicaCount: 1
  transformmisc:
    replicaCount: 1
  aiTransformer:
    replicaCount: 1
  filestore:
    replicaCount: 1
  share:
    replicaCount: 1
  postgresql:
    replicaCount: 1
  alfresco-infrastructure:
    persistence:
      enabled: false
  alfresco-search:
    persistence:
      enabled: false
  externalProtocol: http
  externalHost: 127.0.0.1
  externalPort: 80
Note that instead of using a custom values.yaml file, we could set these values as part of the helm install command line. In practice you’d likely end up with many of these commands. An example argument is:
--set alfresco-content-services.alfresco-search.persistence.enabled=false
The following command run inside the subchart zia-acs will spin up ACS 6.2.0 with our custom PVs and PVCs:
$ helm install . --name acs-vj \
--set global.alfrescoRegistryPullSecrets=quay-registry-zia-secret
This command assumes that you have created a kubernetes secret as mentioned in the previous blog post. The ––name will be used as the {{ .Release.Name }} in the creation of the Solr PV and PVC.
We are disabling the default PV & PVC from the parent chart using the below properties in values.yaml
alfresco-content-services:
  alfresco-infrastructure:
    persistence:
      enabled: false
  alfresco-search:
    persistence:
      enabled: false
The new PV & PVC we are creating above (in our subchart) are used by the ‘alfresco-content-services’ parent chart.
Sharing Custom Helm Subchart
It is well and good that we have a helm subchart. We will need to publish this chart to allow users to spin up this custom subchart. There are multiple ways to do this. The below method uses github to publish this custom chart. More details on creating & hosting chart repositories can be found at https://v2.helm.sh/docs/developing_charts/#create-a-chart-repository. The following steps are needed to host the chart. This example can be viewed at https://github.com/ziaconsulting/demo-helm-acs/tree/v1.0
- Package the subchart
# from the root of the project (https://github.com/ziaconsulting/demo-helm-acs)
$ mkdir zia-acs-release
$ cd zia-acs-release
$ helm package ../helm/zia-acs
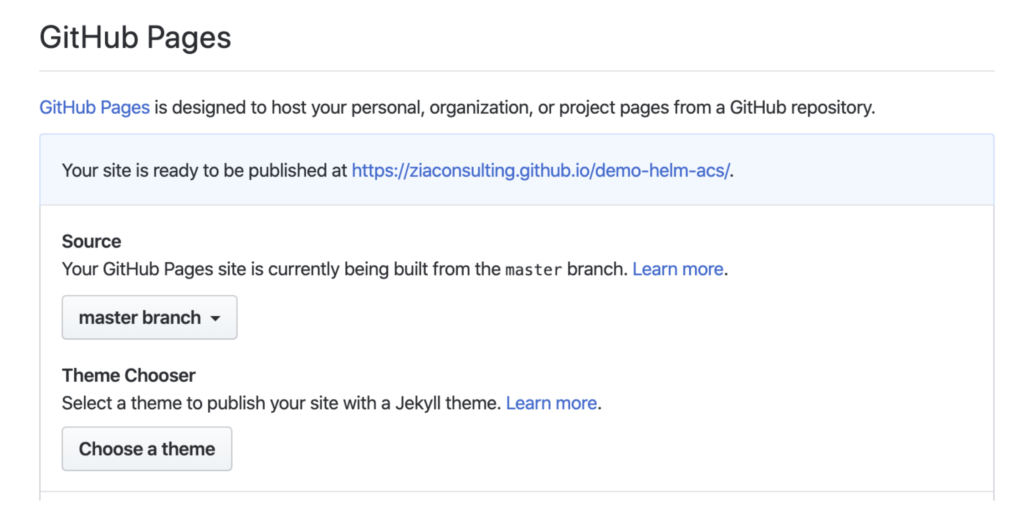
- Create a github repo & configure it to host your chart by making the repo a github page. For this article, we made a project named demo-helm-acs. More details on hosting your chart via github pages can be found at https://v2.helm.sh/docs/chart_repository/#github-pages-example. In my example, unlike the previous link, I have made the master branch a github page as shown in the screenshot below. This change can be made in your repositories settings page.
- Add an index.yaml to your subchart by using the below command. This is required because a chart repository is required to have an index.yaml file. The index.yaml points to where the packaged charts are available. It can be in the same directory or in a different location. In our example, we have the packaged charts in the same directory.
# from the root of the project
$ helm repo index zia-acs-release --url https://ziaconsulting.github.io/demo-helm-acs/zia-acs-release
- zia-acs-release – the name of the folder that contains the generated helm package
- ––url – the folder that contains the helm package
- Push all your changes into the github project.
$ git push origin master
Now the custom subchart is ready for use by other users.
Using Hosted Custom Helm Subchart
The customized helm subchart can be used by following the following steps.
- Add the custom helm repo
$ helm repo add zia-helm-release https://ziaconsulting.github.io/demo-helm-acs/zia-acs-release
- Update your helm repo
$ helm repo update
- Install the custom subchart
$ helm install zia-helm-release/zia-acs --name acs-vj \
--version 0.1.0 \
--set global.alfrescoRegistryPullSecrets=quay-registry-zia-secret
- zia-helm-release – is the repository name created using ‘helm repo add’ command
- zia-acs – name of the custom subchart
- 0.1.0 – default initial helm chart version
- quay-registry-zia-secret – name of the secret created to access Alfresco’s enterprise repository
NOTE: Since the PV created above points to a private folder (/Users/vijayprince/helm/pvc/volumes/solr), you need to replace this folder with a valid folder you have access to.
Cleanup
You can clean up the helm install by using the below command. Warning: This command will remove all your charts.
$ helm delete $(helm list -aq) --purge
Conclusion
We’ve seen how to persist data between multiple helm installs using a subchart. In the next blog post, I will walk you through the steps required to add your Alfresco customization as part of the custom Helm install. Until then, be sure to catch up on this series, or contact Zia to continue the conversation.